
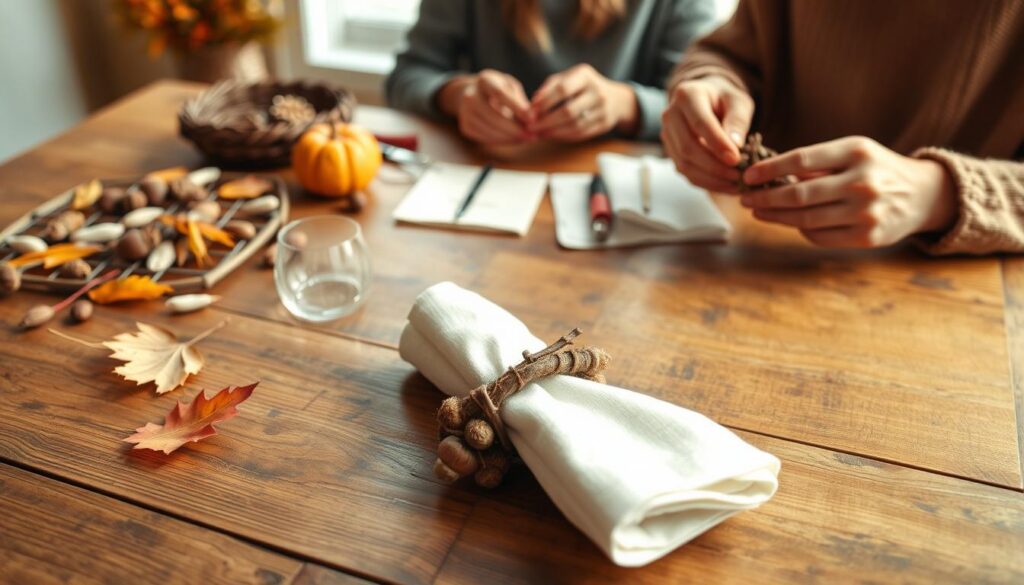
Imagine your holiday table wowing guests without using up all your time or money. Handmade decor adds a special warmth that store-bought items can’t. Let’s make custom napkin holders that turn simple place settings into something everyone talks about.
Last year, I tried air-dry clay and metallic finishes from AC Moore. I found ways to make even beginners look like experts. Mixing textures, like rustic leaves with shiny gold, creates something truly special. You’ll be amazed at how you can turn basic craft supplies into treasures that last a lifetime.
What I love most is how these rings fit any style. Change them up for different seasons or events. I’ll share my top tips, like using printable medallions when you’re short on time. Are you ready to make your table tell a story?
Key Takeaways
- Transform basic materials into elegant table accents
- Personalize designs for any season or theme
- Use budget-friendly supplies from local craft stores
- Master time-saving techniques for busy hosts
- Create professional-looking results without special skills
Introduction to Thanksgiving Napkin Rings
DIY napkin rings add a special touch to your table. They are made with love and natural materials. When I started making my own, my guests noticed the difference right away.
Whether you want a rustic or modern look, your table settings tell your story. Creative Thanksgiving table settings start with details that show who you are.
Why Make Your Own?
Personal touches make holidays unforgettable. Designer Kelsey Hansen once said:
“A leaf-coated pumpkin or hand-stamped leather strip isn’t just decor—it’s an invitation for guests to feel welcomed.”
Last year, I made acorn-themed rings with oak nuts and gold paint. They were a hit! Three relatives wanted to take them home.
Benefits of DIY Decor
Handmade napkin rings have three big advantages:
- Cost-effective: My gilded acorn project cost $8, while similar store-bought sets were $35
- Eco-friendly: Adam Albright’s design uses leftover materials
- Versatile: You can change your style every year—try using dried oranges instead of pinecones
| Store-Bought | Handmade | |
|---|---|---|
| Cost per set | $20-$50 | $5-$15 |
| Unique designs | Limited | Unlimited |
| Material quality | Plastic/metal | Wood/fabric/natural |
My favorite part is that kids can help out. My niece painted mini pumpkins for rings last fall. Mixing natural elements with your own touch makes every place setting special.
Materials Needed for Your Napkin Rings
Starting your fall napkin ring DIY project means getting the right tools. Think of it as your creative toolkit for holiday magic. I start by organizing my space into two parts: essentials and extras. This makes crafting easy and fun, with room for surprises.
Essential Supplies
These items are the core of your project. My must-haves include:
- Air-dry clay (perfect for custom shapes)
- Brown craft paper or burlap strips
- Sharp scissors or X-Acto knives
- Printable medallion templates
- Double-sided tape or fabric glue
I suggest using ribbon in neutral tones like burnt orange or moss green. They match well with most autumn table centerpieces.
Optional Decorations
This is where your rings get their holiday charm! Think about adding:
- Dried sage sprigs or mini pumpkins
- Metallic acrylic paints for accents
- Pressed leaves or pinecones
- Twine with cinnamon stick bundles
Pro tip: Keep seasonal finds in a “grab box” – mine has acorn caps to gold-leaf flakes. When you need inspiration, you’ll have the perfect materials to make your rings stand out.
Step-by-Step Guide to Creating Napkin Rings
Let’s get started on making napkin rings that will impress your guests. We’ll use clay, paper, or fabric. This guide combines smart shortcuts with creative ideas to make your Easy Thanksgiving crafts stand out. I’ll share my top tips, like using a soup can for sizing, to make it easy.
Measure and Cut the Material
Begin by wrapping a napkin around a soup can to find the right size. Add half an inch to the ends for overlap. For clay, roll it to ¼-inch thickness before cutting strips.
Paper or fabric? Cut strips 1.5 inches wide with scissors. Being precise here saves time later.
Assemble Your Ring
Overlap the ends of your strip and glue them together. For clay, press the ends and smooth with a damp finger. If it’s too flimsy, add a thin wire or cardboard inside.
Make a few extra rings. Some might warp while drying!
Add Decorative Touches
This is where you get creative! Try these ideas:
- Press wine corks into clay medallions (Helen Norman’s hack)
- Glue beads in autumn colors along the seam (Source 1’s sparkle factor)
- Hot-glue miniature pinecones or faux leaves
| Decoration Type | Materials Needed | Drying Time |
|---|---|---|
| Clay Medallions | Oven-bake clay, stamps | 15-30 mins |
| Bead Accents | Glass beads, strong glue | Instant |
| Natural Elements | Twigs, dried oranges | 24 hours |
Let decorations dry before placing napkins. Add final touches with metallic paint pens. Write guest names or draw vines. Remember, Your table, your rules! Mix textures for interest without overwhelming the place settings.
Ideas for Different Types of Napkin Rings

Creating holiday tablescapes is fun, and making napkin rings is a big part of it. You can choose from earthy textures, fancy fabrics, or fun designs. These ideas will make your Thanksgiving table look amazing.
Rustic Wooden Napkin Rings
For a cozy feel, try wooden or leather napkin rings. Jason Donnelly shows how to wrap leather around cardboard for a farmhouse look. Here’s how to get that rustic feel:
- Use untreated birch wood slices as natural bases
- Add burlap ribbons with handwritten guest names
- Attach miniature pinecones using hot glue
These natural elements look great with mason jar centerpieces and woven placemats. Let the wood’s grain show for a real rustic look.
Elegant Fabric Napkin Rings
Make your table fancy with fabric napkin rings. Goldenrod fabric flowers add a touch of elegance. Here’s how to make them:
- Cut velvet or satin ribbons into 4-inch strips
- Secure ends with discreet fabric glue
- Hot-glue a fabric flower to the front
For extra shine, add pearl beads or metallic thread. These elegant rings look great with fine china and crystal.
Fun and Festive Paper Napkin Rings
Be creative with colorful paper designs. Kids can help make these fun rings. Use:
- Printable leaf medallions
- Turkey-shaped crayon holders
- Patterned scrapbook paper
Use double-sided tape to layer paper textures. Add fun touches like mini clothespins with gratitude notes. These light rings are perfect for casual gatherings and add joy to holiday tablescapes.
Pro tip: Mix all three styles for a unique table. Combine leather, fabric flowers, and paper accents. The mix of textures makes each setting special.
Personalizing Your Napkin Rings
Making DIY napkin ring holders is more than crafting. It’s about making your Thanksgiving table uniquely yours. Whether it’s a small family dinner or a big party, adding personal touches makes decor stand out. Let’s see how to add personality to every detail.
Adding Names for Place Settings
I love using wood slice markers for a rustic look. Write guests’ names with a metallic pen or attach mini chalkboard tags. For a fancy touch, try printable medallions with elegant fonts. They fit perfectly in ribbon-wrapped rings. Pro tip: Chalk markers let you reuse tags year after year, saving time and materials.
Carve names into thin birch bark strips or stamp them onto linen bands. These methods match natural textures, keeping your DIY napkin ring holders in line with autumn themes.
Incorporating Seasonal Themes
Thanksgiving is all about harvest warmth. Try adding dried wheat stalks or faux autumn leaves to your designs. I’ve used Cameron Sadeghpour’s grass arrangement technique—nestling preserved eucalyptus sprigs around napkins—for a fresh, earthy look.
For a playful touch, carve tiny pumpkins from orange cardstock and glue them to rings. You can even paint miniature gourds with metallic accents. These seasonal touches add festivity without overwhelming the table.
“The best decor tells a story. Mix textures like burlap, lace, and twine to reflect gratitude’s many layers.”
Tips for Coordinating with Your Thanksgiving Table
Creating a cohesive tablescape starts with thoughtful coordination. Napkin rings are like the final punctuation mark in your decor – small but impactful. Let’s explore how to harmonize colors and proportions for a balanced look.

Matching Colors with Your Decor
Color harmony makes your table feel intentional. My go-to strategy is the 60-30-10 rule: 60% dominant color (like tablecloths), 30% secondary shade (plates or centerpieces), and 10% accent (hello, napkin rings!). For example:
- Pair Source 1’s muted blue napkin rings with beige linen for modern farmhouse vibes
- Use metallic gold rings against deep burgundy runners as Source 3 suggests
- Try painted acorn designs in burnt orange and sage for organic warmth
Balancing with Other Table Elements
Your rings shouldn’t compete with other decor. I follow Helen Norman’s layering philosophy: “Stack plates low, elevate florals, let napkin rings bridge the gap.” Three ways to achieve balance:
- Match ring textures to candle holders (wood with wood, metal with metal)
- Keep height under 2” if using tall centerpieces
- Repeat one color from your charger plates in the rings
Last Thanksgiving, I used rustic copper rings with amber glassware and wheat stem arrangements. The metallic accents tied everything together without overwhelming guests’ sightlines. Remember – your napkin rings are supporting players, not the main act!
Techniques for Enhancing Your Napkin Rings
Turning simple napkin rings into stunning table decorations is easy. With a few creative steps, you can make them stand out. Let’s look at how paint, stain, and embellishments can take your DIY decor to the next level.
Using Paint or Stain
Metallic gold spray paint can add a touch of luxury to wooden rings. For a rustic look, stain them with walnut or oak. A great tip is to rub cinnamon along raw edges before sealing. It adds a warm, textured look and smells like autumn.
Pear gilding from Source 1 adds a subtle shimmer. Always test finishes on scrap materials first. Here’s a quick comparison of popular techniques:
Embellishments to Consider
Marty Baldwin’s terracotta pot accents add earthy charm. Source 1’s bittersweet sprigs offer organic texture. Don’t forget these options:
| Embellishment | Materials Needed | Visual Impact |
|---|---|---|
| Velvet Ribbon Bows | 1/4″ ribbon, glue | Luxurious & Tactile |
| Mini Terracotta Pots | 3cm pots, twine | Rustic Farmhouse |
| Dried Botanical Sprigs | Bittersweet, eucalyptus | Natural Elegance |
For family-friendly projects, let kids add pre-cut felt leaves or painted acorns. The key is to balance detail without overcrowding. One standout feature per ring usually works best.
Involving Family in the DIY Process
Getting family involved in DIY projects makes decorating a fun, memorable experience. It’s not just about getting things done faster. It’s about sharing laughs and bonding before the big feast.

Crafting Together With Kids
Kids enjoy helping out with holiday decorations when they can do it themselves. For example, making napkin rings is a great activity. Use pre-cut turkey shapes from coloring printables (like Source 1’s design) as a fun twist.
Little ones can add googly eyes, while bigger kids can use blunt-tip scissors on Source 2’s patterns. This helps them learn while having fun.
Here’s a tip: Use their creations as simple Thanksgiving centerpieces. A bunch of their napkin rings around a candle holder can make your table look amazing.
Hosting a DIY Napkin Ring Party
Turn crafting into a fun party with my station method:
- Clay molding area (air-dry clay works best)
- Printing station for autumn leaf patterns
- Finishing zone with glitter and ribbons
Guests move from station to station, enjoying cider and cookies. Last year, we made enough rings for three families’ tables. It’s a great way to mix simple Thanksgiving centerpieces with personal touches from everyone.
Maintenance and Storage for Napkin Rings
Keeping your handmade napkin rings in top shape is easy. Each material, like wood, fabric, and paper, needs special care. I’ll share my best tips to keep them looking great for years. A little care now means you’ll enjoy them for many Thanksgivings.
Cleaning After Use
Material matters! For clay or painted rings, a soft cloth and mild soap work well. Sealing them with Mod Podge helps prevent stains. Fabric rings need gentle spot-cleaning to avoid fading. Here’s a quick guide:
- Wood: Wipe with a dry cloth; avoid water
- Fabric: Lightly dab spills immediately
- Paper: Use compressed air for dust
Storing for Future Thanksgivings
I store mine in boxes with cork dividers to prevent scratches. Label each section if you have themed sets. Pro tip: Snap a photo of your table arrangement before storing. It’ll save time next year when you want to recreate it.
| Material | Cleaning Method | Storage Tip |
|---|---|---|
| Wood | Dry wipe only | Wrap in tissue paper |
| Fabric | Spot clean | Store flat to prevent creases |
| Paper | Dust carefully | Use acid-free sleeves |
Conclusion: The Joy of Handmade Holiday Decor
Making DIY Thanksgiving napkin rings adds warmth to your table that store-bought items can’t. Each fold, brushstroke, or embellishment shows your personality. It turns simple settings into topics of conversation.
These small projects often become treasured keepsakes. They’re even more special when they include handwritten notes or family initials.
Reflecting on Your DIY Experience
Think about how your handmade napkin rings changed your Thanksgiving table. You might have used rustic wood, fabric scraps, or fun paper designs. Each piece has its own story.
My favorite moment is seeing guests smile at personalized touches. Like names carved into clay or autumn leaf designs.
Encouragement to Get Creative
Don’t just stop at napkin rings—try new things! Mix materials like air-dry clay and printable patterns for unique textures. Invite friends over for a crafting day to make gifts.
Try adding metallic paint to burlap or attaching mini pinecones for a woodland look. The beauty of DIY is there’s no wrong way to express yourself.
When you put away your creations, remember they’re more than decorations. They’re memories of crafting, laughing, and celebrating handmade holidays. Next year, you’ll see them with new eyes and maybe a fresh idea.